Mobile Dev
Comparison of Cross-Platform Frameworks (Flutter, React & Xamarin)
December 24, 2022
Comparison of Cross-platform frameworks (Flutter, React Native & Xamarin)
Welcome to my blog post on cross-platform mobile development frameworks! In this post, I will be comparing my experience using Flutter, React Native, and Xamarin to develop a simple quiz app. The app fetches data from a Firebase Firestore NoSQL database, allowing users to choose between different quizzes and see their results after answering all the questions. I will be discussing the pros and cons of each framework and providing my personal recommendations based on my experience. You can find the code for this project on my Github.
Three years ago, when I was first learning about app development, I knew that I wanted to use a cross-platform framework. I didn't want to have to learn multiple programming languages and I wanted to be able to quickly develop apps for both Android and iOS. That's when I came across Flutter, React Native, and Xamarin. After careful consideration, I ultimately decided to go with Flutter and I have been incredibly happy with my choice.
Cross-platform app development refers to the practice of creating a single app that can be run on multiple platforms, such as Android, iOS, and potentially even web and desktop. This is in contrast to native app development, which involves creating a separate app for each platform using different programming languages and tools. One of the main advantages of cross-platform app development is that it allows developers to create an app once and deploy it to multiple platforms, potentially saving time and resources. It can also make it easier for developers to maintain the app, as they only have to make updates in one place rather than multiple. Additionally, cross-platform app development can potentially reach a wider audience, as the app can be accessed on multiple platforms.
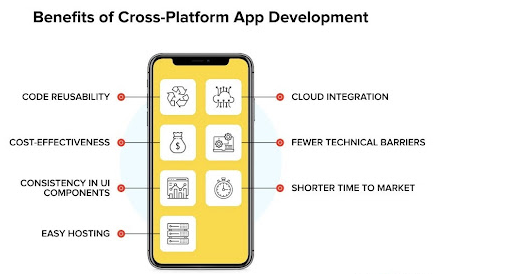
Source: Net Solutions
In this blog post, I will be comparing Flutter, React Native, and Xamarin in terms of ease of use, performance, and community support. Whether you're a seasoned app developer or just starting out, I hope this comparison will help you decide which framework is best for your needs.
About the Quiz App
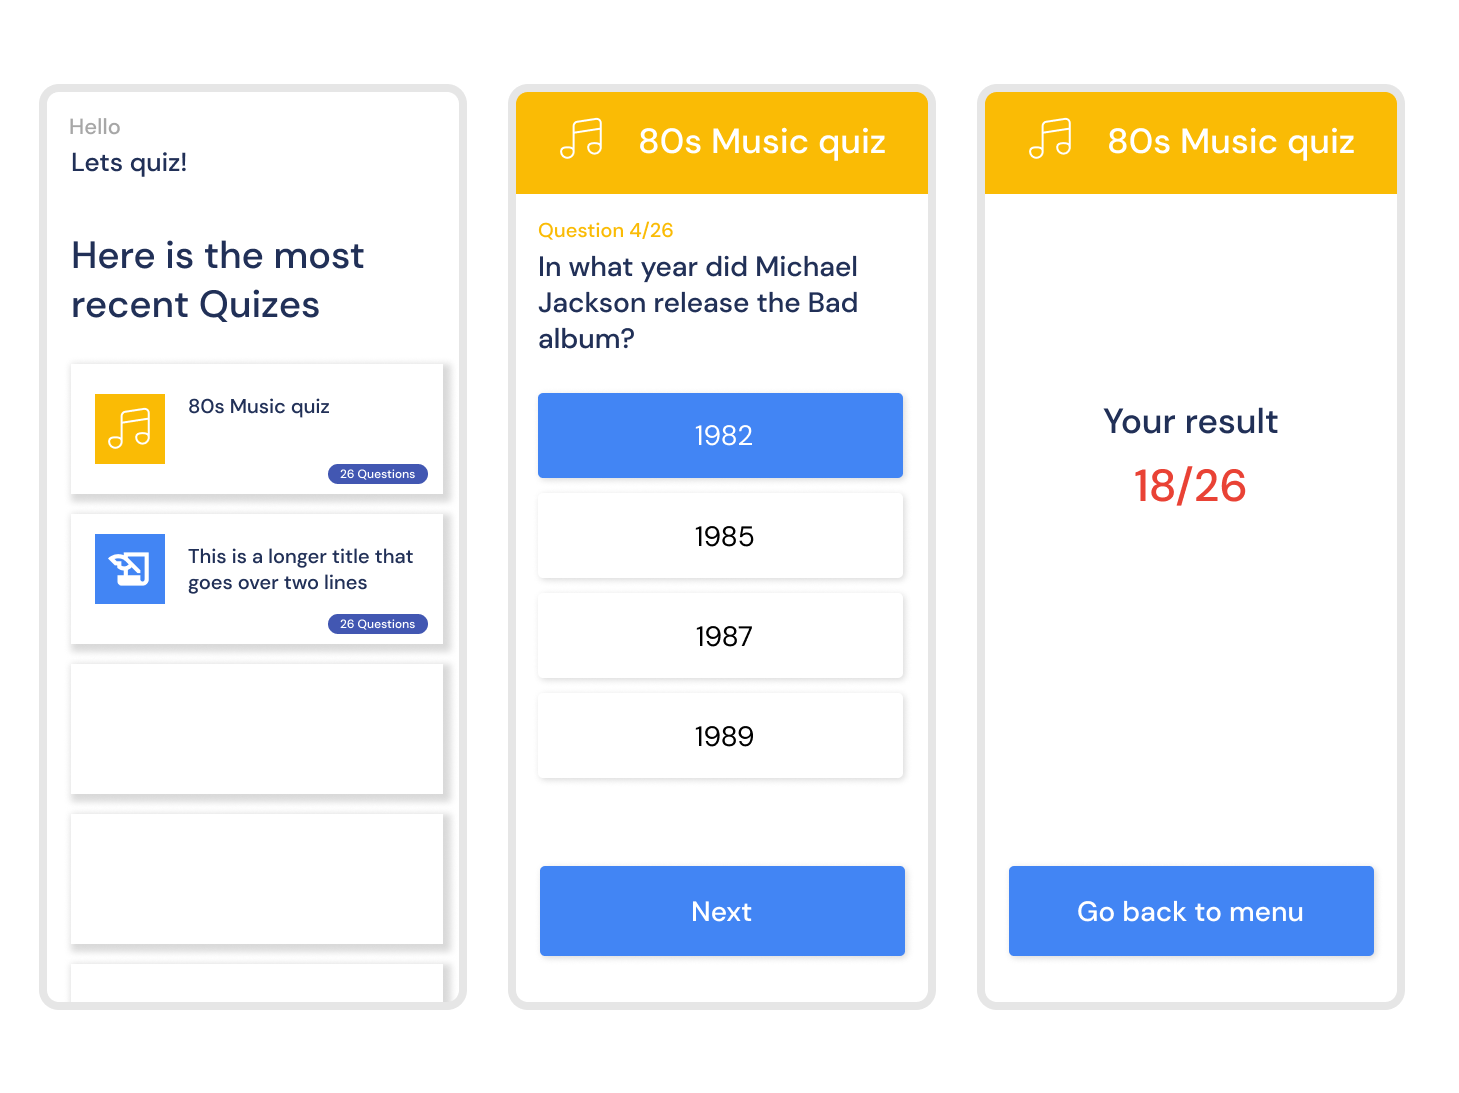
The quiz app allows users to choose from a selection of quizzes stored in a Firebase Firestore database. Each quiz is comprised of a title, a set of questions, and an icon (only used in the Flutter app). The app displays a list of all the available quizzes, each with their own unique color.
On the quiz page, users can select an answer and press the "next" button to move on to the next question. After answering all the questions, users are taken to the last page where they can see their results and return to the first page to choose another quiz. The app is simple and easy to use, making it a great tool for anyone looking to test their knowledge or just have some fun.
There were several challenges that I faced while developing this app, including:
1. Retrieving data from the database: One of the main challenges was figuring out how to fetch data from the Firebase Firestore database and display it in the app.
2. Managing the state of the app and the UI: Another challenge was managing the state of the app and ensuring that the UI was updated appropriately as the user navigated through the app
3. Styling the app: Lastly, I faced some challenges in styling the app to make it look professional and visually appealing.
Overall, these challenges required us to have a good understanding of the frameworks and their capabilities, as well as the ability to troubleshoot and problem-solve as we encountered issues.
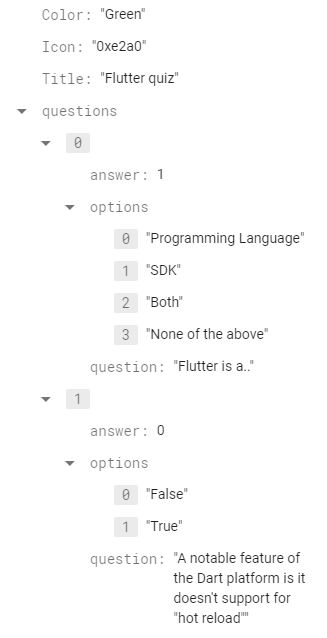
Screenshot of how the fields in the database looks like
Picture of what the app desgin looks like
Flutter
Flutter is a cross-platform mobile development framework created by Google. It uses the Dart programming language and allows developers to build natively compiled apps for mobile, web, and desktop from a single codebase. Flutter has gained popularity in recent years due to its fast development cycle, expressive and flexible UI, and strong support from Google. It also has a large and active community, with many resources and packages available to help developers get started with Flutter. In this blog post, we will be discussing our experience using Flutter to develop our quiz app and the pros and cons of using this framework.
My experience
I have been using Flutter for over 30 projects, so I am very confident in my abilities with this framework. As a result, developing this quiz app was a relatively easy process for me. The Flutter project was organized into three different folders: components, functions, and pages. The components folder contained various buttons and blocks used in the app, the functions folder contained the provider, database, quiz class, and theme files, and the pages folder contained the home, quiz, and result pages.
It took me about 5 hours to develop the app after I had set up the database and done the design. I really appreciate the wide range of available widgets and the ease of adding packages. In my opinion, Flutter is the fastest way to develop a mobile application.
One thing that can be challenging in Flutter, especially for beginners, is understanding the state management system. However, once you have developed a few apps with Flutter, it becomes much more intuitive. A package that I find particularly helpful is the Google Fonts package, which gives me access to almost 1,000 different fonts to use in my app. Overall, I really enjoy using Flutter and find it to be a powerful and efficient framework.
Advantages
Flutter is a popular cross-platform mobile development framework with a number of advantages. Some of the main benefits of using Flutter include:
1. Fast development cycle: Flutter has a hot reload feature that allows developers to make changes to their code and see the results in real-time, without the need to manually rebuild and deploy the app. This speeds up the development process and makes it easier to test and debug.
2. Expressive and flexible UI: Flutter comes with a wide range of pre-designed widgets that allow developers to easily create beautiful and responsive user interfaces. It also allows for customizing the look and feel of the app through its own set of graphics and animations.
3. Strong support from Google: Flutter is developed and maintained by Google, which means it has strong support and a large community of developers. There are also many resources and packages available to help developers get started with Flutter.
4. One codebase for multiple platforms: With Flutter, developers can create a single app that can be run on multiple platforms, including Android, iOS, and potentially even web and desktop. This saves time and resources compared to native app development.
5. Good performance: Flutter apps are compiled to native code, which means they have good performance and a smooth user experience.
Overall, Flutter is a powerful and efficient framework that is well-suited for fast and reliable cross-platform app development.
Disadvantages
While Flutter has many advantages, there are also some potential disadvantages to consider. Some of the main drawbacks of Flutter include:
1. Larger app size: Flutter apps tend to be larger in size compared to native apps, due to the fact that they include the Flutter framework and libraries in addition to the app code. This can be an issue for users with limited storage on their devices.
2. Learning curve: Flutter has its own set of concepts and patterns, which can be difficult for developers who are new to the framework. It may take some time to get up to speed with Flutter and become proficient in using it.
3. Limited use of native components: While Flutter allows for integration with native components, it may not always be possible to use all native features and functionality. This can be a limitation for developers who want to create apps that make heavy use of native functionality
React Native
React Native is a cross-platform mobile development framework created by Facebook. It uses the JavaScript programming language and allows developers to build natively compiled apps for mobile using the same principles as React, a popular web development framework. React Native has gained popularity due to its ability to write code that can be shared across both Android and iOS, as well as its ability to leverage the power of native components. It also has a large and active community, with many resources and packages available to help developers get started with React Native. In this blog post, we will be discussing our experience using React Native to develop our quiz app and the pros and cons of using this framework.
My experience
This was my first time developing a mobile app with React Native, although I had some previous experience with React web development. One thing I really appreciated about React Native was the way styles are separated from the rest of the code, making it easier to read and understand.
const styles = StyleSheet.create({
  container
: {
      height: '100%',
      backgroundColor: "#fff"
  },});
Overall, the development process was fast and the code was logical. If you have a background in JavaScript or web development, I believe you would find it relatively easy to create a mobile app with React Native. As someone coming from a Flutter background, I did miss some of the built-in widgets that Flutter offers, but I think with more experience using React Native, it becomes more familiar.
The React Native community is also quite large, which means it's easy to get help and find tutorials on various concepts. Overall, I found React Native to be a powerful and effective framework for mobile app development.
Advantages
React Native is a popular cross-platform mobile development framework with a number of advantages. Some of the main benefits of using React Native include:
1. Developers with knowledge of the React framework can use React Native to build native mobile apps without learning the native languages of the target operating systems. The framework's core components are converted into their native counterparts at build time. This allows developers to leverage their existing skills and build apps efficiently.
2. Fast development cycle: React Native has a hot reload feature that allows developers to make changes to their code and see the results in real-time, without the need to manually rebuild and deploy the app. This speeds up the development process and makes it easier to test and debug.
3. Strong community: React Native has a large and active community, with many resources and packages available to help developers get started with the framework.
4. Leverages native components: React Native allows developers to leverage native components, which means that apps built with React Native can have good performance and a native-like user experience.
Overall, React Native is a powerful and efficient framework that is well-suited for fast and reliable cross-platform app development.
Disadvantages
Although React Native is a widely popular framework, it does have some limitations.
1. One of these is limited platform support: while React Native allows developers to use the same codebase for iOS and Android apps, it does not support other platforms such as macOS, Windows, or Linux. Other cross-platform development frameworks, such as Flutter, offer support for a wider range of platforms out of the box.
2. Additionally, some frameworks provide more built-in UI components that do not require external libraries. This can be useful for developers who want to add more unusual or specific UI elements to their app, as they may have to rely on third-party packages when using React Native. These packages may not be updated frequently, which can pose security risks.
Xamarin
Xamarin Forms is a cross-platform mobile development framework created by Microsoft. It allows developers to build native apps for Android, iOS, and Windows using C# and the .NET framework. Xamarin Forms allows developers to create a single codebase that can be shared across all three platforms, saving time and resources compared to native app development. It also provides access to native functionality and performance, as well as a wide range of pre-designed UI controls and layouts. In this blog post, we will be discussing our experience using Xamarin Forms to develop our quiz app and the pros and cons of using this framework.
It's worth noting that Microsoft has recently released .NET MAUI (Multi-platform App UI), which is a new cross-platform framework for building native mobile apps. .NET MAUI is built on top of Xamarin Forms and is designed to be a more modern and efficient way to build cross-platform apps. It includes new features such as Hot Reload and improved performance, as well as support for the latest platforms and technologies. While Xamarin Forms is still a viable option for building cross-platform apps, developers may want to consider .NET MAUI as a potential alternative.
My Experience
This was my first time using C# and the .NET framework to develop an app, and I found the experience to be quite challenging. The development process took much longer than expected and there were several things that I struggled with. The syntax for C# is more complex than for languages like Dart and JavaScript, which made it difficult for me to get the hang of it.
In Xamarin Forms, the code for each page is divided into a XAML file for UI elements and styling, and a C# file for functions. It took some time to get used to this structure.
Additionally, I felt like the Xamarin community was smaller and less active compared to the communities for frameworks like React Native and Flutter. This made it harder for me to find answers to my questions and resources to help me learn. Additionally, I noticed that I didn't get as much help or attention when asking questions on forums like Stack Overflow. Overall, I found Xamarin Forms to be a powerful but challenging framework to work with.
One of the challenges I encountered while working with Xamarin Forms was understanding the concept of Binding context and how to pass objects between the XAML file and the code-behind file. One particularly tricky aspect was using Binding inside a ListView. In the example below, you can see that I wanted to pass a parameter from the ListView Binding to a function that had its own Binding from the QuizPageModel. This required me to use the RelativeSource AncestorType and specify the type of the ancestor element in order to access the Binding from the QuizPageModel. Overall, working with Binding and passing objects between the XAML and code-behind files in Xamarin Forms can be challenging, but with practice and a deeper understanding of the framework, it becomes easier to handle these tasks.
<StackLayout >
                <ListView x:Name="listView"  ItemsSource="{Binding CurrentOptionsClass}" HasUnevenRows="True" SeparatorVisibility="None" SelectionMode="None" >
                    <ListView.ItemTemplate >
                        <DataTemplate >
                            <ViewCell >
                                <StackLayout Padding="30,0,30,0" >
                                    <Frame

                                        VerticalOptions="Center"
                                        Margin="0,3,0,12"
                                        HorizontalOptions="FillAndExpand"
                                        HeightRequest="35"
                                        CornerRadius="5"
                                        BackgroundColor="{Binding ButtonColor}"
                                        >
                                        <Frame.GestureRecognizers>
                                            <TapGestureRecognizer Command="{Binding Path=ChooseOptionCommand, Source={RelativeSource AncestorType={x:Type local:QuizPageModel}}}" CommandParameter="{Binding Index}" />
                                        </Frame.GestureRecognizers>
                                        <Label Text="{Binding Option}"
                                               FontFamily="DMSans-Regular"
                                           FontSize="20"
                                           VerticalOptions="Center"
                                           HorizontalOptions="Center"
                                            TextColor="{Binding TextColor}">
                                        </Label>
                                    </Frame>
                                </StackLayout>
                            </ViewCell>
                        </DataTemplate>
                    </ListView.ItemTemplate>
                </ListView>
            </StackLayout>
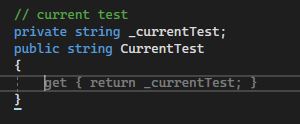
To develop a xamarin forms app I needed to use visual studio instead of visual studio code. While it was a bit of a learning curve for me to get used to Visual Studio, I did appreciate the prediction features of the IDE, which helped to speed up the development process by suggesting code as I typed.
Advantages
One of the main advantages of Xamarin is that it allows developers to use C# and the .NET framework to create apps for multiple platforms using a single codebase. Xamarin offers two UI approaches: Xamarin.Native, which allows developers to use each platform's native UI components for a more native-like user experience, and Xamarin.Forms, which allows for a shared UI across devices for a more unified experience.
C# is a popular programming language that many developers are already familiar with, making Xamarin a particularly appealing choice for those who want to leverage their existing skills in cross-platform development. In addition, there are many third-party libraries available for Xamarin, which can further enhance the capabilities of the framework.
Disadvantages
One potential issue with using Xamarin is that it can be time-consuming for developers to familiarize themselves with the native technologies of the target platforms, particularly if the project involves a lot of visual components.
Another potential concern with Xamarin is app size and performance. Like other cross-platform frameworks, Xamarin apps tend to be larger in file size compared to natively developed apps, and may not achieve the same level of performance.
Additionally, it's worth noting that while Xamarin itself is open-source and can be used by individual developers for free, companies will need to purchase licenses for Visual Studio in order to use the framework. These licenses can be costly, which may be a factor to consider when deciding whether to use Xamarin for a project.
State management
In Flutter, there are several ways to manage the state of an app, and one popular method is to use the provider package. To use this package, you simply need to import it in pubspec.yaml and create a class that extends ChangeNotifier.
class QuizProvider extends ChangeNotifier {
  int? _selectOption = null;


  int? get selectOption => _selectOption;
  set setselectOption(int index) {
    _selectOption = index;
    notifyListeners();
  }


  void changeselectOption(int index) {
    _selectOption = index;
    notifyListeners();
  }
}
This class should include private variables and getters and setters for those variables, as well as any other functions you may want to include. Then, you can wrap the MaterialApp in a MultiProvider and add your providers, which allows you to access them from anywhere in your app. While using the provider package to manage state in Flutter may seem confusing at first, with practice it becomes very logical and easy to use.
In React Native , the state is managed using React Hooks. In quiz_page.js the useState hook is used to create three state variables: index, chosen, and points. index is the current question index, chosen is the index of the chosen answer, and points is the number of correct answers. These state variables are updated using the setIndex, setChosen, and setPoints functions respectively.
For example, when the user chooses an answer, the setChosen function is called with the index of the chosen answer as the argument. This updates the chosen state variable and re-renders the component with the new value. Similarly, when the user moves to the next question, the setIndex function is called with the new index as the argument, updating the index state variable and re-rendering the component.
// Create the variables
const [index, setIndex] = useState(0);
const [chosen, setChosen] = useState(null);
const [points, setPoints] = useState(0);


// Change the variable state
setChosen(index)
setIndex(index + 1)
In the Xamarin app, state is managed using properties in the QuizPageModel class that hold values such as the current chosen option, the current options, the current answer, the current question number, and the total number of questions. These properties are marked with the INotifyPropertyChanged interface, which allows them to notify when their values change and trigger updates in the user interface. The OnPropertyChanged method is called to raise the PropertyChanged event and notify any listeners that the value of a property has changed. The state is also updated through the use of commands, such as the NextQuestion and ChooseOptionCommand commands, which are used to handle user interactions and update the values of the properties accordingly.
// current question
private string _currentQuestionText;
public string CurrentQuestionText
{
 get { return _currentQuestionText; }
 set
  {
     _currentQuestionText = value;
     OnPropertyChanged();
   }
}
Then you call the model in c# file that is connected to the quizpage xaml
BindingContext = new QuizPageModel(questions);Then you can use it in the xaml file like this:
<StackLayout Padding="30,10,30,20">
                <Label Text="{Binding TitleText}"
               TextColor="#FABB05"
               FontSize="18"
               FontFamily="DMSans-Medium" />
                <Label Text="{Binding CurrentQuestionText}"
               TextColor="#213057"
               FontSize="22"
               FontFamily="DMSans-Medium" />
            </StackLayout>
Database fetching
In flutter the data fetching was pretty straightforward:
1. Get the data
Future<QuerySnapshot>getQuizes() async {
    Future<QuerySnapshot<Map<String, dynamic>>> quizes =
firestore.collection('quiz').get();
    return await quizes;
  }
2. Call the function in a FutureBuilder
FutureBuilder(
                future: db.getQuizes(),
                builder: (context, snapshot) {
3. Use the snapshot inside a listview
ListView.builder(
                        itemCount: snapshot.data!.docs.length,
                        padding: const EdgeInsets.only(
                          top: 10,
                          left: 30.0,
                          right: 30.0,
                        ),
                        itemBuilder: (context, index) {
                          dynamic data = snapshot.data!.docs[index].data();
                          Quiz quiz = Quiz(
                              questions: data["questions"],
                              color: colors[data["Color"]],
                              icon: IconData(int.parse(data["Icon"]), fontFamily: 'MaterialIcons'),
                              title: data["Title"]);
                          return QuizBlock(
                            quiz: quiz,
                          );
                        },
                      );
In React Native, the useEffect hook is used to fetch the data from the firestore collection when the component is mounted. The onSnapshot function of the collection is used to listen to real-time updates to the collection and update the data in the component's state accordingly. When the component unmounts, the subscriber function is returned and called to unsubscribe from the real-time updates. The loading state is used to display a loading indicator while the data is being fetched, and the fetched data is stored in the data state. The FlatList component is then used to display the data by rendering a list of Quizbox components, passing in the relevant data as props.
const colorMap = {"Blue": "#4285F4", "Yellow": "#FABB05", "Green": "#34A853", "Red": "#E94235"};
const Home = ({navigation}) => {
    const [loading, setLoading] = useState(true); // Set loading to true on component mount
    const [data, setData] = useState([]); // Initial empty array of users


    useEffect(() => {
        const subscriber = firestore()
    .collection('quiz')
    .onSnapshot(querySnapshot => {
      const data = [];


      querySnapshot.forEach(documentSnapshot => {
        data.push({
          ...documentSnapshot.data(),
          key: documentSnapshot.id,
        });
      });


      setData(data);
      setLoading(false);
    });
        // Unsubscribe from events when no longer in use
    return () => subscriber();
    }, []);
    if (loading) {
        return <ActivityIndicator />;
    }

    return (
        <View >
            <SafeAreaView style={styles.safearea}>
                <View>
                    <View style={styles.column}>
                        <Text style={styles.textGrey}>Hello</Text>
                        <Text style={styles.headlineBlue}>Lets quiz!</Text>
                        <View style={styles.sizedbox1}></View>
                        <Text style={styles.bigText}>Here is the most recent Quizes</Text>
                    </View>
                    <View style={styles.sizedbox2}></View>
                    <View style={styles.expanded}>
                        <FlatList data={data} renderItem={({item, index}) => {
                            return  (
                                <Quizbox title={item['Title']} color={colorMap[item['Color']]} questions={item['questions']}
                                onPress={() => navigation.navigate("QuizPage",{gametitle: item['Title'], questions: item['questions'], color: colorMap[item['Color']]})} />
                            )
                        }}/>
                    </View>
                </View>
            </SafeAreaView>
        </View>
    )
}
In this Xamarin code, data is fetched from the database and stored in a list of Quiz objects. The OnAppearing method calls the GetAllData method, which uses the CrossCloudFirestore plugin to retrieve a list of documents from the "quiz" collection. The data from each document is then used to create a Quiz object, which includes a list of QuizQuestion objects. The list of Quiz objects is then assigned to the ItemsSource property of the myListView control, which displays the data in the UI. It was more challenging to implement data fetching in this Xamarin code than in the Flutter and React Native examples.
        protected override async void OnAppearing()
        {
            base.OnAppearing();


            // Call the GetAllData method and store the returned task
            var dataTask = GetAllData();


            // Use the await operator to wait for the task to complete
            var quizzes = await dataTask;

            myListView.ItemsSource = quizzes;
        }


        public async Task<List<Quiz>> GetAllData()
        {
            var group = await CrossCloudFirestore.Current.Instance.Collection("quiz").GetAsync();
            var yourModels = group.Documents.ToList();


            Dictionary<string, string> colorMap = new Dictionary<string, string>
{
    { "Blue", "#4285F4" },
    { "Yellow", "#FABB05" },
    { "Green", "#34A853" },
    { "Red", "#E94235" }
};


            var quizzes = new List<Quiz>();


            foreach (var document in yourModels)
            {

                var quiz = new Quiz();


                // Set the properties of the Quiz object
                String color = document.Data["Color"].ToString();
                quiz.Color = colorMap[color];

                quiz.Title = document.Data["Title"].ToString();


                // Get the list of quiz questions from the document data
                dynamic questions = document.Data["questions"];
                var questionsTemp = new List<QuizQuestion>();

                foreach (var question in questions)
                {

                    var questionTemp = new QuizQuestion();
                    questionTemp.Answer = (int)question["answer"];

                    questionTemp.Question = (string)question["question"];
                    List<dynamic> options = question["options"];
                    questionTemp.Options = options.Select(x => (string)x).ToArray();

                    questionsTemp.Add(questionTemp);
                }

                quiz.Questions = questionsTemp;


                // Add the Quiz object to the list
                quizzes.Add(quiz);

            }

            return quizzes;
        }
Styling components
In Flutter, styling is usually done using the Theme widget, which allows you to specify the default colors, fonts, and shapes for an app. Styles can be applied directly to widgets using the style property, or you can use a separate style widget to apply styles to a widget tree. In this project I have defined the common colors and fonts, but then added styling directly to other object
// in theme.dart
/// FONTS
var headlineBlue = GoogleFonts.dmSans(color: blue1, fontWeight: FontWeight.w500);
var headlineWhite = GoogleFonts.dmSans(color: Colors.white, fontWeight: FontWeight.w500);


/// COLORS
var blue2 = const Color.fromRGBO(66, 87, 178, 1);
var blue1 = const Color.fromRGBO(33, 48, 87, 1);

// in resultpage.dart
Text(
                "Your result",
                style: headlineBlue.copyWith(fontSize: 32),
              ),
In React Native, styles are applied using a declarative approach similar to CSS. You can create style objects and apply them to components using the style prop. React Native also supports the use of inline styles, which allows you to apply styles directly to a component using an object literal.
// in home.js
<Text style={styles.headlineBlue}>Lets quiz!</Text>


const styles = StyleSheet.create({
headlineBlue: {
        fontSize: 24,
        color: "#213057",
        fontFamily: 'DMSans-Medium',


    }
})
In Xamarin, styles are defined using a syntax similar to CSS. You can create a Style class that defines the visual appearance of a control, and then apply that style to a control using the StyleId property. You can also create style sheets that define multiple styles, and apply those styles to controls using a syntax similar to CSS class selectors.
// In quizpage.xaml
<StackLayout
                x:Name="AppBar"
                HeightRequest="70"
                   WidthRequest="100"
                   HorizontalOptions="FillAndExpand"
                   VerticalOptions="Start"

                   Padding="0, 20, 0, 0">
                <Label x:Name="TitleText"
               FontSize="32"
               TextColor="White"
               FontFamily="DMSans-Medium"
               HorizontalTextAlignment="Center"
               VerticalTextAlignment="Center" />
Summary
In this blog post, I compared my experience using Flutter, React Native, and Xamarin to develop a simple quiz app that fetches data from a Firebase Firestore database. I discussed the pros and cons of each framework and provided my personal recommendations based on my experience. Flutter was my preferred choice due to its fast development cycle, expressive and flexible UI, and strong support from Google. If I came from a Javascript or web development background I would consider using React Native instead, but I’m atleast very happy that I chose Flutter three years ago. I would not recommend choosing Xamarin if you don’t have any .Net experience, and even If you do I would advice to look into .Net Maui instead.
Share